splunk attack range

Save Time and Improve your Security Posture with Splunk Attack Range

The security posture of organizations is one of the most important factors year after year when it comes to defining internal strategies.

“Global cyberattacks increased by 38% in 2022 compared to 2021, with an average of 1168 weekly attacks per organization”

~ Check Point Research

The quote from Check Point Research above illustrates where the future trend of cybersecurity is headed and the challenges that organizations must face. However, anticipating and preparing the system defenses to evade and mitigate these attacks is not an easy task. From defining response and incident strategies to preparing work teams and configuring monitoring systems, it can all be a challenge.

Your core business is not to detect and mitigate security attacks, but is this essential to the achievement of your objectives? Have you ever wondered how you can simulate attacks and detections within a controlled environment to validate the configuration of your detection systems without spending part of your annual security budget? Read on and discover Splunk Attack Range.

What is Splunk Attack Range?

Splunk Attack Range is a tool developed by Splunk Threat Research Team (STRT) to simulate cyber attacks in a controlled environment for the purpose of improving an organization’s security posture. It allows security teams to test and validate their detection and response capabilities against a wide range of attack scenarios and techniques, such as phishing, malware infections, lateral movement, and data exfiltration.

Splunk Attack Range is designed to work with Splunk Enterprise Security, which is a security information and event management (SIEM) solution, and includes pre-built attack scenarios that are aligned with the MITRE ATT&CK framework, these ones can be customized to simulate the specific threats and vulnerabilities that are relevant to an organization’s environment.

splunk attack range

Where can I get Attack Range?

The STRT and the Splunk community are maintaining the project in GitHub.

Is Splunk Attack Range Easy to Deploy?

Yes, it is really straightforward! You can deploy it locally (if you have a powerful machine), on Azure or on AWS. Internally, we use our AWS environment and with a few simple steps, in a matter of minutes, terraform and ansible automatically deploy a complete test lab to validate our customers’ security configurations and optimize the security posture with Splunk’s real-time monitoring. This process allows for a proactive approach to managing security postures with Splunk and saves a lot of time for your Blue Team.

…and now?

Have fun! By merging our Splunk expertise and using these kinds of automation tools, we have been able to speed up our internal testing processes, stay agile and secure with Splunk’s security posture management tool, and transfer this knowledge and configurations on to our customers’ cybersecurity teams.

We strongly encourage you to try this tool. Check out an overview of v1.0, v2.0 and v3.0 in the Splunk blog.


Looking to expedite your success with Splunk Attack Range? Click here to view our Splunk Professional Service offerings.

Splunk Professional Services Partner

© Discovered Intelligence Inc., 2023. Unauthorised use and/or duplication of this material without express and written permission from this site’s owner is strictly prohibited. Excerpts and links may be used, provided that full and clear credit is given to Discovered Intelligence, with appropriate and specific direction (i.e. a linked URL) to this original content.

Solving Roaming Users: HTTP Out for the Splunk Universal Forwarder

The release of version 8.1.0 of the Splunk Universal Forwarder introduced a brand new feature to support sending data over HTTP. Traditionally, a Splunk Universal Forwarder uses the proprietary Splunk-to-Splunk (S2S) protocol for communicating with the Indexers. Using the ‘HTTP Out Sender for Universal Forwarder’ it can now send data to a Splunk Indexer using HTTP. What this feature does is effectively encapsulates the S2S message within a HTTP payload. Additionally, this now enables the use of a 3rd party load-balancer between Universal Forwarders and Splunk Receivers. To date, this is a practice which has not been recommended, or supported, for traditional S2S based data forwarding.

Where the new HTTP Out feature is especially useful is in scenarios such as collecting data from systems in an edge location or collecting data from a roaming user’s device. Typically in these situations it would require more complex network configuration, or network traffic exceptions, to support traditional S2S for the connection from the Universal Forwarder to the Indexers. HTTP Out now allows the Universal Forwarder to make use of a standard protocol and port (443), which is generally open and trusted, for outgoing traffic.

Use Case: The Roaming User

Let’s take a look at how we can use the HTTP Out feature of the Splunk Universal Forwarder to transmit data from the laptop of a roaming user, or generally a device outside of our corporate perimeter, which is an occurrence that has become more and more common with the shift to work from home during the pandemic.

For the purpose of this demonstration, we will be working with the following environment configuration:

  1. Splunk environment in AWS with 2 Indexers and 1 Search Head
  2. Internet-facing AWS Load Balancer
  3. Laptop with the Splunk Universal Forwarder (8.1.0)

Step 1: Configure The Receiver

On our Splunk Indexers we have already configured the HTTP Event Collector (HEC) and created a token for receiving data from the Universal Forwarder. Detailed steps for enabling HEC and creating a token can be found on the Splunk Documentation site here.

Step 2: Configure The Load Balancer

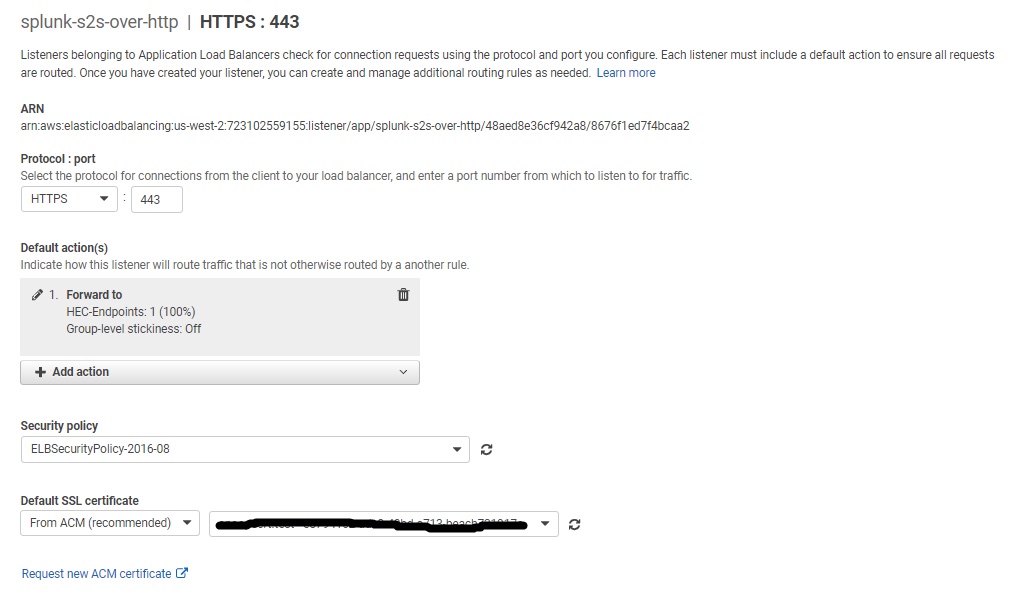
The next thing we need is a Load Balancer which is Internet facing. HTTP Out on the Splunk Universal Forwarder supports Network Load Balancers and Application Load Balancers.  For this use case, we have created an Application Load Balancer in AWS. The Load Balancer has a listener created for receiving connection requests on port 443 and forwards them to the Splunk Indexer on port 8088 (the default port used for HEC). The AWS Application Load Balancer provides a DNS A record which we will be using in the Universal Forwarder outputs configuration.

Step 3: Configure The Universal Forwarder

The last step is to install Splunk Universal Forwarder on the roaming user’s laptop and configure HTTP Out using the new httpout stanza in outputs.conf.

We have installed the Universal Forwarder on one of our laptops and created the following configuration within the outputs.conf file. For ease of deployment, the outputs.conf configuration file is packaged in a Splunk application and deployed to the laptop to enable data forwarding via HTTP.

[httpout]
httpEventCollectorToken = 65d65045-302c-4cfc-909a-ad70b7d4e593
uri = https://splunk-s2s-over-http-312409306.us-west-2.elb.amazonaws.com:443 

The URI address within this configuration is the Load Balancer DNS address which will handle the connection requests to Splunk HTTP Event Collector endpoints on the Indexers. 

The Splunk Universal Forwarder HTTP Out feature also supports batching to reduce the number of transactions used for sending out the data. Additionally, a new configuration LB_CHUNK_BREAKER is introduced in props.conf. Use this configuration on the Universal Forwarder to break events properly before sending the data out. When HTTP Out feature is used with a 3rd party load balancer, LB_CHUNK_BREAKER prevents partial breaking of a data, and sends a complete event to an Splunk Indexer. Please refer to the Splunk Documentation site here for detailed information on the available parameters.

Test and Verify Connectivity

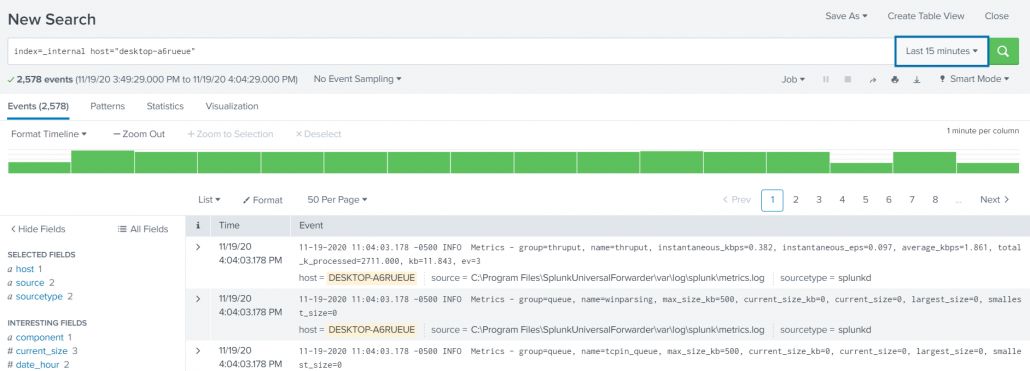
Now that we have our configuration in place we need to restart the Splunk Universal Forwarder service. After this restart occurs we can immediately see that the internal logs are being received by our Splunk Indexers in AWS. This is a clear indicator that the HTTP Out connection is working as expected and data is flowing from the Universal Forwarder to the Load Balancer and through to our Splunk Indexers.

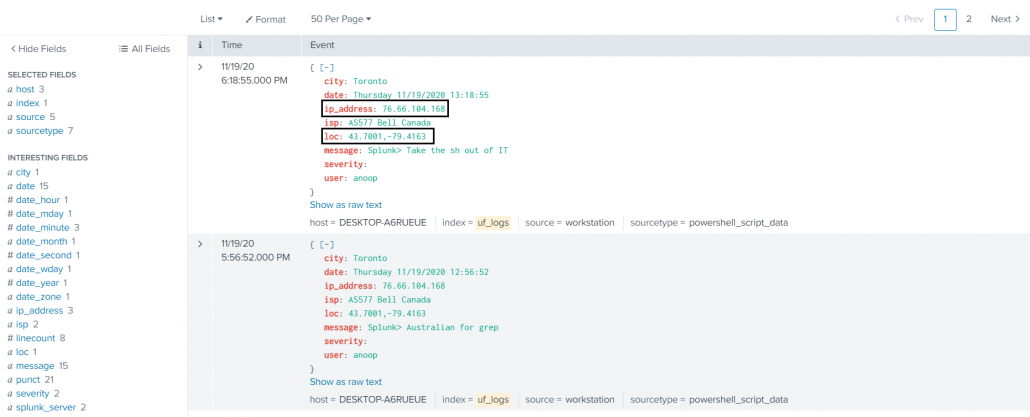
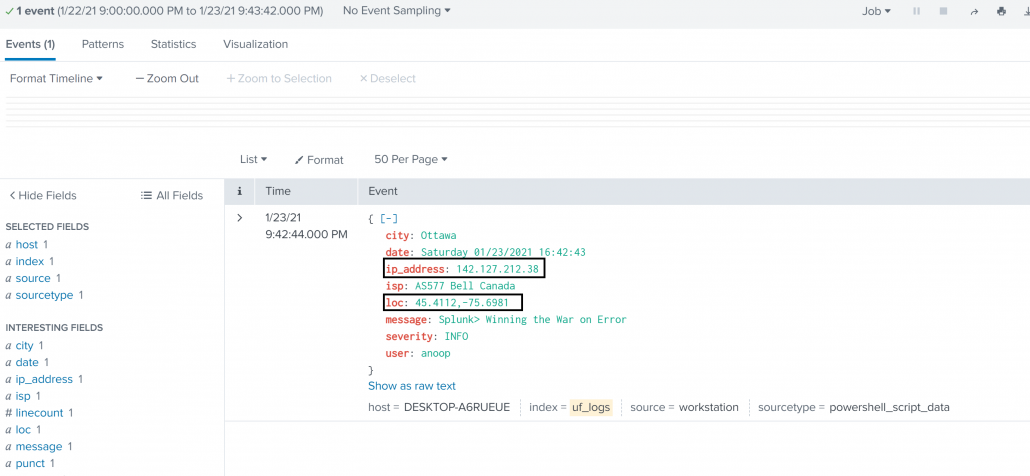
To demonstrate the roaming use case, we have written a small PowerShell script that will run on the laptop. The PowerShell script will generate events printing the current IP address, user, location, city, etc. The Splunk Universal Forwarder will execute this PowerShell script as a scripted input and read the events generated by it. Now, when we search within our Splunk environment we can see that the events being generated by the PowerShell script are flowing correctly, and continuously, to our Splunk Indexers. The laptop connects to the Load Balancer via a home network with no special requirements for network routing or rules.

Let’s now move to a different network by tethering the laptop through a mobile phone for Internet connectivity. This is something that may be common for people while on the road or in areas with minimal wifi access. What we will now observe is that data forwarding to our Splunk Indexers continues without any interruption even though we are on a completely new network with its own infrastructure, connectivity rules, etc. The screenshot below shows that the location and IP address of the laptop has changed however the flow of events from the laptop has not been interrupted.

This configuration could now be deployed to an entire fleet of roaming user devices to ensure that no matter where they are or what network they are on, there is continuous delivery of events using an Internet-facing Load Balancer. This will help IT and Security teams make sure they have the necessary information at all times to support, and protect, their corporate devices.


Looking to expedite your success with Splunk? Click here to view our Splunk Professional Service offerings.

© Discovered Intelligence Inc., 2021. Unauthorised use and/or duplication of this material without express and written permission from this site’s owner is strictly prohibited. Excerpts and links may be used, provided that full and clear credit is given to Discovered Intelligence, with appropriate and specific direction (i.e. a linked URL) to this original content.
Oops! You Indexed Sensitive Data in Splunk

Every organization deals with sensitive data like Personally Identifiable Information (PII), Customer Information, Propriety Business Information…etc. It is important to protect the access to sensitive data in Splunk to avoid any unnecessary exposure of it. Splunk provides ways to anonymize sensitive information prior to indexing through manual configuration and pattern matching. This way data is accessible to its users without risking the exposure of sensitive information. However, even in the best managed environments, and those that already leverage this Splunk functionality, you might at one point discover that some sensitive data has been indexed in Splunk unknowingly. For instance, a customer facing application log file which is actively being monitored by Splunk may one day begin to contain sensitive information due to a new application feature or change in the application logging.

This post provides you with two options for handling sensitive data which has already been indexed in Splunk.

Option 1: Selectively delete events with sensitive data

The first, and simplest, option is to find the events with sensitive information and delete them. This is a suitable choice when you do not mind deleting the entire event from Splunk. Data is marked as deleted using the Splunk ‘delete’ command. Once the events are marked as deleted, they are not going to be searchable anymore.

As a pre-requisite, ensure that the account used for running the delete command has the ‘delete_by_keyword’ capability. By default, this capability is not provided to any user. Splunk has a default role ‘can_delete’ with this capability selected, you can add this role to a user or another role (based on your RBAC model) for enabling the access.

Steps:

  1. Stop the data feed so that it no longer sends the events with sensitive information.
  2. Search for the events which need to be deleted.
  3. Confirm that the right events are showing up in the result. Pipe the results of the search to delete command.
  4. Verity that the events deleted are no longer searchable.

Note: The delete command does not remove the data from disk and reclaim the disk space, instead it hides the events from being searchable.

Option 2: Mask the sensitive data and retain the events

This option is suitable when you want to hide the sensitive information but do not want to delete the events. In this method we use rex command to replace the sensitive information in the events and write them to a different index.

The summary of steps in this method are as follows:

  1. Stop the data feed so that it no longer sends the events with sensitive information.
  2. Search for the intended data.
  3. Use rex in sed mode to substitute the sensitive information.
  4. Create a new index or use an existing index for masked data.
  5. With the collect command, save the results to a different index with same sourcetype name.
  6. Delete the original (unmasked) data using the steps listed in Option 1 above.

As mentioned in Option 1 above, ensure that the account has the ‘delete_by_keyword’ capability before proceeding with the final step of deleting the original data.

Let’s walk through this procedure using a fictitious situation. Let us take an example of an apache access log monitored by Splunk. Due to a misconfiguration in the application logging, the events of the log file started registering customer’s credit card information as part of the URI.

Steps:

  1. Disable the data feed which sends sensitive information.
  2. Search for the events which contains the sensitive information. As you can see in the screenshot, the events have customer’s credit card information printed.

3. Use the rex command with ‘sed’ mode to mask the CC value at search time.

index="main" sourcetype="apache_access" action=purchase CC=* 
| rex field=_raw mode=sed "s/CC=(\S+)/CC=xxxx-xxxx-xxxx-xxxx/g"

The highlighted regular expression matches the credit card number and replaces it with its new masked value of ‘xxxx’.

4. Verify that the sensitive information is replaced with the characters provided in rex command.

5. Pipe the results of the search to ‘collect’ command to send the masked data to a different index with same sourcetype.

index="main" sourcetype="apache_access" action=purchase CC=* 
| rex field=_raw mode=sed "s/CC=(\S+)/CC=xxxx-xxxx-xxxx-xxxx/g" 
| collect index=masked sourcetype=apache_access

6. Verify the masked data has been properly indexed using the collect command and is now searchable.

Note: Adjust the access control settings so that the users can access the masked data in the new/different index.

7. Once all events have been moved over to the new index, we need to delete the original data from the old index by running the delete command.

As mentioned earlier, ensure that you have capabilities to run ‘delete’ command.

8. Verify that data has been deleted by searching for it, as noted in Step 2 above.

9. Remove the ‘delete_by_keyword’ capability from the user/role now that the task is completed.

What Next?

Enable Masking at Index Time

It is always ideal to configure application logging in such a way that it does not log any sensitive information. However, there are exceptions where you cannot control that behavior. Splunk provides two ways to anonymize/mask the data before indexing it. Details regarding the methods available can be found within the Splunk documentation accessible through the URL below:

https://docs.splunk.com/Documentation/Splunk/latest/Data/Anonymizedata

Additionally, products such as Cribl LogStream (free up to 1TB/day ingest) provide a more complete, feature-rich, solution for masking data before indexing it in Splunk.

Audit Sensitive Data Access

Finally, if you have unintentionally indexed sensitive data before it was masked then it is always good to know if that data has been accessed during the time at which it was indexed. To audit if the data was accessed through Splunk, the following search can shed some light into just that. You can adjust the search to filter the results based on your needs by changing the filter_string text to the index, sourcetype, etc, which is associated with the sensitive data.

index=_audit action=search info=granted search=* NOT "search_id='scheduler" NOT "search='|history" NOT "user=splunk-system-user" NOT "search='typeahead" NOT "search='| metadata type=sourcetypes | search totalCount > 0" 
| search search="*filter_string*" 
| stats count by _time, user, search savedsearch_name

Looking to expedite your success with Splunk? Click here to view our Splunk Professional Service offerings.

© Discovered Intelligence Inc., 2020. Unauthorised use and/or duplication of this material without express and written permission from this site’s owner is strictly prohibited. Excerpts and links may be used, provided that full and clear credit is given to Discovered Intelligence, with appropriate and specific direction (i.e. a linked URL) to this original content.

FloCon 2019 and the Data Challenges Faced by Security Teams

In early January of this year I was able to attend FloCon 2019 in New Orleans. In this posting, I will provide a little bit of insight into this security conference, some of the sessions that I attended, and detail some of the major data challenges facing security teams.

It was not hard to convince me to go to New Orleans for obvious reasons: the weather is far nicer than Toronto during the winter, cajun food and the chance to watch Anthony Davis play at the Smoothie King Center. I also decided to stay at a hotel off of Bourbon Street which happened to be a great decision. Others attending FloCon decided to arrange accommodations on Bourbon Street ended up needing ear plugs to get a good night’s rest! Enough about that though and let’s talk about the conference itself.

About FloCon

FloCon is geared towards researchers, developers, security experts and analysts looking for techniques to analyze and visualize data for protection and defense of networked systems. The conference is quite small, with a few hundred attendees rather than the 1000s that attend conferences I have attended in the past, like Splunk Conf and the MIT Sloan Conference. However, the smaller number of attendees in no way translated to a worse experience. FloCon was mostly single track (other than the first day), which meant I did not have to reserve my spot for popular session. The smaller number also resulted in greater audience participation.

The first day was split between two tracks: (1) How to be an Analyst and (2) BRO training. I chose to attend the “How to be an Analyst” track. For the first half of the day, participants of the Analyst track were given hypothetical situations which was followed by discussions on hypothesis testing and what kind of data would be of interest to an analyst in order to determine a positive threat. The hypothetical situation in this case was potential vote tampering (remember this is a hypothetical situation). The second half of the day was supposed to be a team game which involved questions and scoring based multiple choice answers. However, the game itself could not be scaled out to the number of participants, therefore the game was completed with all participants working together, which led to some interesting discussions. The game needs some work, but it was interesting to see how different participants thought through the scenarios and how individuals would go about investigating Indicators Of Compromise (IOCs).

The remaining three days saw different speakers present their research on machine learning, applying different algorithms to network traffic data,  previous work experience as penetration testers, key performance indicators, etc. The most notable of the speakers being Jason Chan, VP of Cloud Security at Netflix. Despite some of the sessions being heavily research based and with a lot of graphs (some of which I’m sure went over the heads of some of us in attendance), common themes kept arising about the challenges faced by organizations – all of which Discovered Intelligence has encountered on projects. I have identified some of these challenges below.

Challenge: Lack of Data Standardization Breaks Algorithms

I think everyone knows that scrubbing data is a pain. It does not help that companies often change the log format with new releases of software. I have seen new versions break queries because a simple change has cascading effects on the logic built into the SIEM. Changing the way information is presented can also break machine learning algorithms, because the required inputs are no longer available.

Challenge: Under Investing in Fine-Tuning & Re-iterations

Organizations tend to underestimate the amount of time needed to fine-tune queries intended for threat hunting and anomaly detection. The first iteration of a query is rarely perfect and although it may trigger an IOC, analysts will start to realize there are exceptions and false positives. Therefore, overtime teams must fine-tune the original queries to be more accurate. The security team for the Bank of England spends approximately 80% of their time developing and fine-tuning use cases! The primary goal being to eliminate alert fatigue, and to keep everything up-to-date in an ever changing technological world. I do not think there is a team out there that gets “too few” security alerts. For most organizations, the reality is: that there are too many alerts and not enough resources to investigate. Since there are not enough resources, fine-tuning efforts never happen and analysts will begin to ignore alerts which trigger too often.

An example of the first iteration of an alert which can generate high volumes is failed authentications to a cloud infrastructure. If the organization utilizes AWS or Microsoft Cloud, they may see a huge number of authentication failures for their users. Why and how? Bad actors are able to identify sign-in names and emails from social media sites, such as LinkedIn or company websites. Given the frequently used standards, there is a good chance that bad actors can guess usernames just based off an individual’s first and last name. Can you stop bots from trying to access your Cloud environment? Unlikely, and if you could, the options are limited. After all, the whole point of Cloud is the ability to access it anywhere. All you can really do is minimize risk by requiring internal employees to use things like multi-factor authentication, biometric data or VPN. At least this way even if a password was obtained a bad actor will have difficulty with the next layer of security. In this type of situation though, alerting on failed authentications alone is not the best approach and creates a lot of noise. Instead, what teams might start to do is correlate authentication failures with users who do not have multi-factor enabled, thereby paying more attention to those who are at greater risk of a compromised account. These queries evolve through re-iteration and fine-turning, something which many organizations continue to under invest in.

Challenge: The Need to Understand Data & Prioritize

Before threats and anomalies can be detected accurately and efforts divided appropriately, teams have to understand their data. For example, if the organization uses multi-factor, how does that impact authentication logs? Which event codes are teams interested in for failed authentications on domain controllers? Is there a list of assets and identities, so teams can at least prioritize investigations for critical assets and personnel with privileged access?

A good example of the need to understand data is multi-factor and authentication events. Let’s say an individual is based out of Seattle and accessing AWS infrastructure requiring Okta multi-factor authentication. The first login attempt will come from an IP in Seattle, but the multi-factor authentication event is generated in Virginia. These two authentication events happen within seconds of each other. A SIEM may trigger an alert for this user because it is impossible for the user to be in both Seattle and Virginia in the given timeframe. Therefore, logic has to built in to the SIEM, so this type of activity is taken into consideration and teams are not alerted.

Challenge: The Security Analyst Skills Gap

Have you ever met an IT, security or dev ops team with too little work or spare time? I personally have not. Most of the time there is too much work and not enough of the right people. Without the right people, projects and tasks get prolonged. As a result, the costs and risks only rise overtime. Finding the right people is a common problem and not one just faced by the security industry, but there is a clearly a gap in the positions available and the skills in the workforce.

Challenge: Marketing Hype Has Taken Over

We hear the words all the time. Machine Learning. Artificial Intelligence. Data Scientists. How many true data scientists have you met? How many organizations are utilizing machine learning outside of manufacturing, telematics and smart buildings? Success stories are presented to us everywhere, but the amount of effort to get to that level of maturity is immense and there is still a lot of work to be done for high levels of automation to become the norm in the security realm.

In most cases, organizations are looking at data for the first time and leveraging new platforms for the first time. They still do not know what normal behaviour looks like in order to determine an event as an anomaly. Even then, how many organizations can efficiently go through a year’s worth of data to baseline behaviour? Do they have the processing power? Can it scale out to the entire organization? Although there is some success a turnkey solution really does not exist. Each organization is unique. It takes time, the right culture, roadmap planning and the right leadership to get to the next level.

Challenge: How Do You Centralize Logs? Understanding the Complete Picture

In order to accomplish sophisticated threat hunting and anomaly detection a number of different data sources must be correlated to understand the complete picture. These sources include AD logs, firewall logs, authentication, VPN, DHCP, network flow, etc. Many of these are high volume data sources so how will people analyze the information efficiently? Organizations have turned to SIEMs to accomplish this. Although SIEMs work well in smaller environments, scaling out appropriately is a significant challenge due to data volumes, a lack of resources (both people and infrastructure) and the lack of training and education for users and senior management.

In most cases, a security investigation begins and analysts start to realize there are missing pieces and missing data sets to get the complete picture of what is happening. At which point, additional data sources must be on-boarded and the fine-tuning process starts again.

Wrap Up and FloCon Presentations

This posting highlights some of the data challenges that are facing security teams today. These challenges are present in all industry verticals, but with the right people and direction companies can begin to mature and automate processes to identify threats and anomalies efficiently. Oh, and did I mention, with our industry leading, security data and Splunk expertise, Discovered Intelligence can help with this!

Overall FloCon was a great learning experience and I hope to be able to attend again some time in the future. The FloCon 2019 presentations are available for review and download here: https://resources.sei.cmu.edu/library/asset-view.cfm?assetid=540074


Looking to expedite your success with Splunk? Click here to view our Splunk Professional Service offerings.

© Discovered Intelligence Inc., 2019. Unauthorised use and/or duplication of this material without express and written permission from this site’s owner is strictly prohibited. Excerpts and links may be used, provided that full and clear credit is given to Discovered Intelligence, with appropriate and specific direction (i.e. a linked URL) to this original content.

How to Create a Splunk KV Store State Table or Lookup in 10 Simple Steps

As of Splunk 6.2, there is a Key-Value (KV) store baked into the Splunk Search Head. The Splunk KV store leverages MongoDB under the covers and among other things, can be leveraged for lookups and state tables. Better yet, unlike regular Splunk CSV lookups, you can actually update individual rows in the lookup without rebuilding the entire lookup – pretty cool! In this article, we will show you a quick way of how you can leverage the KV store as a lookup or state table. Read more

Heartbleed Command for Splunk

heartbleedDiscovered Intelligence has developed a simple Splunk command for identifying Heartbleed vulnerabilities!

This CIM-Compliant Technology Add-on (TA-Heartbleed) contains a new heartbleedtest Splunk command that can be used to check your internal infrastructure and external websites for the recently announced Heartbleed vulnerability. Read more

Splunk’s Application for Enterprise Security Comes of Age

Splunk’s recently announced version 3.0 of its popular Splunk Application for Enterprise Security has come of age, delivering powerful functionality with a slick user experience. Read more