We had a recent request to create a Splunk alert that runs hourly with a time range of midnight UTC of current date to current time. This sounds like an easy request, but when you look into it it’s a bit more complicated than it seems.
https://discoveredintelligence.com/wp-content/uploads/2024/11/savedsearch-2.png509854Darren Fullerhttps://discoveredintelligence.com/wp-content/uploads/2013/12/DI-Logo1-300x137.pngDarren Fuller2024-11-15 13:38:362024-11-18 14:59:42Running a Splunk Search in a Different Time Zone
Integrating Splunk Enterprise Security (ES) with Splunk Security Orchestration, Automation and Response (SOAR) can significantly enhance your organization’s security operations. By automating alert handling and response processes, this integration streamlines security incident management and enables faster, more effective threat mitigation. Splunk SOAR empowers security teams to automate actions based on Splunk ES detections using assigned playbooks, enabling seamless incident resolution.
https://discoveredintelligence.com/wp-content/uploads/2024/08/es_soar.jpg5751000Discovered Intelligencehttps://discoveredintelligence.com/wp-content/uploads/2013/12/DI-Logo1-300x137.pngDiscovered Intelligence2024-09-30 18:01:202025-12-17 16:27:03Enhancing Security Operations: The Unified Integration of Splunk ES and SOAR
If you are like me when I started with Cribl, you will have plenty of Splunk knowledge but little to no Cribl experience. I had yet to take the training, had no JavaScript experience, and only had a basic understanding of Cribl, but I didn’t let that stop me and just dove in. Then I immediately struggled because of my lack of knowledge and spent countless hours Googling and asking questions. This post will list the information I wish I had possessed then, and hopefully make your first Cribl experience easier than mine.
Cribl Quick Reference Guide
If I could only have one item on my wish list, it would be to be aware of the Cribl Quick Reference Guide. This guide details basic stream concepts, performance tips, and built-in and commonly used functions.
Creating that first ingestion, I experienced many “how do I do this” moments and searched for hours for the answers, such as “How do I create a filter expression?” Generally, filters are JavaScript expressions essential to event breakers, routes, and pipelines. I was lost unless the filter was as simple as 'field' == 'value.' I didn’t know how to configure a filter to evaluate “starts with,” “ends with,” or “contains.” This knowledge was available in the Cribl Quick Reference Guide in the “Useful JS methods” section, which documents the most popular string, number and text Javascript methods.
Common Javascript Operators
Operator
Description
&&
Logical and
||
Logical or
!
Logical not
==
Equal – both values are equal – can be different types.
===
Strict equal – both values are equal and of the same type.
!=
Returns true if the operands are not equal.
Strict not equal (!==)
Returns true if the operands are of the same type but not equal or are of different kinds.
Greater than (>)
Returns true if the left operand is greater than the right operand.
Greater than or equal (>=)
Returns true if the left operand is greater than or equal to the right operand.
Less than (<)
Returns true if the left operand is less than the right operand.
Less than or equal (<=)
Returns true if the left operand is less than or equal to the right operand.
Regex
Cribl uses a different flavour of Regex. Cribl uses ECMAScript, while Splunk uses PCRE2. These are similar, but there are differences. Before I understood this, I spent many hours frustrated that my Regex code would work in Regex101 but fail in my pipeline.
Strptime
It’s almost identical to the version that Splunk uses, but there are a few differences. Most of my problems were when dealing with milliseconds. Cribl uses %L, while Splunk uses %3Q or %3N. Consult D3JS.org for more details on the strptime formatters.
JSON.parse(_raw)
When the parser function in a pipeline does not parse your JSON event, it may be because the JSON event is a string and not an object. Use an eval function with the Name as _raw and the Value Expression set to JSON.parse(_raw), which will convert the JSON to an object. A side benefit of JSON.parse(_raw) is that it will shrink the event’s size, so I generally include it in all my JSON pipelines.
Internal Fields
All Cribl source events include internal fields, which start with a double underscore and contain information Cribl maintains about the event. Cribl does not include internal fields when routing an event to a destination. For this reason, internal fields are ideal for temporary fields since you do not have to exclude them from the serialization of _raw. To show internal fields, click the … (Advanced Settings) menu in the Capture window and toggle Show Internal Fields to “On” to see all fields.
Event Breaker Filters for REST Collector or Amazon S3
Frequently, expressions such as “sourcetype=='aws:cloudwatchlogs:vpcflow‘” are used in an Event breaker filter, but sourcetype cannot be used in an Event Breaker for a REST Collector or an Amazon S3 Source. This is because this sourcetype field is set using the input’s Fields/Metadata section, and the Event Breaker is processed before the Field/Metadata section.
For a REST collector, use “__collectible.collectorId=='<rest collector id>'” internal field in your field expression, which the REST collector creates on execution.
One of Cribl Stream’s most valuable functions is the ability to effortlessly drop fields that contain null values. Within the parser function, you can populate the “Fields Filter Expression” with expressions like value !== null.
Some example expressions are:
Expression
Meaning
value !== null
Drop any null field
value !== null || value==’N/A’
Drop any field that is null or contains ‘N/A’
Once I obtained these knowledge nuggets, my Cribl Stream was more efficient. Hopefully, my pain will be your gain when you start your Cribl Stream journey.
https://discoveredintelligence.com/wp-content/uploads/2024/06/things_i_wish_i_knew_cribl.png532800Terry Mulliganhttps://discoveredintelligence.com/wp-content/uploads/2013/12/DI-Logo1-300x137.pngTerry Mulligan2024-07-08 13:00:002024-07-08 17:05:59Cribl Stream: Things I wish I knew before diving in
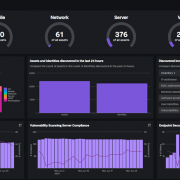
At the recent Splunk .Conf in Las Vegas a couple of weeks ago, we were able to get a detailed demo of Splunk’s new and exciting Splunk Asset and Risk Intelligence (Splunk ARI) security solution. What a great solution and one that is much needed within their security solution portfolio. Splunk ARI falls into a category of products known as CAASM – Cyber Asset Attack Surface Management. In this post, we dive a little deeper into what CAASM is, why it is critical tool for your organization and how Splunk ARI can help.
https://discoveredintelligence.com/wp-content/uploads/2024/06/ari_homepage.png4651000Discovered Intelligencehttps://discoveredintelligence.com/wp-content/uploads/2013/12/DI-Logo1-300x137.pngDiscovered Intelligence2024-07-02 09:00:002024-07-17 14:09:26Splunk Asset and Risk Intelligence – a CAASM Solution for Splunk
Still winding down from the incredible experience at .conf24, where we delved into the latest market trends, we’ve uncovered several fascinating enhancements for the Splunk platform. These improvements not only elevate the performance and efficiency of Splunk but also offer exciting features that will be available in future releases. Join us as we explore four powerful upgrades that can be used in your Splunk environment.
https://discoveredintelligence.com/wp-content/uploads/2024/06/splunk_training_video.jpg613900Discovered Intelligencehttps://discoveredintelligence.com/wp-content/uploads/2013/12/DI-Logo1-300x137.pngDiscovered Intelligence2024-06-11 15:36:522024-06-26 15:53:53Learning Splunk with the new ‘Getting Started with Splunk’ Video Series
April marked the beginning of a new era for Cribl with the introduction of Cribl Lake, which brings Cribl’s suite of products full circle in the realm of data management. In this post we dive a bit deeper into some of the benefits and features of Cribl Lake.
https://discoveredintelligence.com/wp-content/uploads/2024/05/cribl-lake-1.png354553Discovered Intelligencehttps://discoveredintelligence.com/wp-content/uploads/2013/12/DI-Logo1-300x137.pngDiscovered Intelligence2024-06-06 16:21:352024-06-06 16:30:10Introducing the benefits and features of Cribl Lake
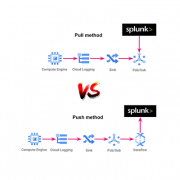
In this blog we will talk about the processes and the options we have to collect the GCP events and we will see how to collect those in Splunk. In addition, we will even add integration with Cribl, as an optional step, in order to facilitate and optimize the process of information ingestion. After synthesizing all of this great information, you will have a great understanding of the available options to take, depending on the conditions of the project or team in which you work.
https://discoveredintelligence.com/wp-content/uploads/2023/08/gcp_splunk_spotlight.png400600Discovered Intelligencehttps://discoveredintelligence.com/wp-content/uploads/2013/12/DI-Logo1-300x137.pngDiscovered Intelligence2023-08-09 16:34:142023-08-29 01:04:31Building a Unified View: Integrating Google Cloud Platform Events with Splunk
Anyone who is familiar with writing search queries in Splunk would admit that eval is one of the most regularly used commands in their SPL toolkit. It’s up there in the league of stats, timechart, and table.
For the uninitiated, eval, just like in any other programming context, evaluates an expression and returns the result. In Splunk, especially when searching, holds the same meaning as well. It is arguably the Swiss Army knife among SPL commands as it lets you use an array of operations like mathematical, statistical, conditional, cryptographic, and text formatting operations to name a few.
Read more about eval here and eval functions here.
What is an Ingest-time Eval?
Until Splunk v7.1, the eval command was only limited to search time operations. Since the release of 7.2, eval has also been made available at index time. What this means is that all the eval functions can now be used to create fields when the data is being indexed – otherwise known as indexed fields. Indexed fields have always been around in Splunk but didn’t have the breadth of capabilities for populating them until now.
Ingest-time eval doesn’t overlap with other common index-time configurations such as data filtering and routing, but only complements it. It lets you enrich the event with fields that can be derived by applying the eval functions on existing data/fields in the event.
One key thing to note is that it doesn’t let you apply any transformation to the raw event data, like masking.
When to use Ingest-time eval
Ingest-time eval can be used in many different ways, such as:
Adding data enrichment such as a data center field based on a host naming convention
Normalizing fields such adding a field with a FQDN when the data only contains a hostname
Using additional fields used for filtering data before indexing
Performing common calculations such as adding a GB field when there is only a MB field or the length of a field with a string
Ingest-time eval can also be used with metrics. Read more here.
When not to use Ingest-time eval
Ingest-time eval, like index-time field extractions, adds a performance overhead on the indexers or heavy forwarders (whichever is handling the parsing of data based on your architecture) as they will be evaluated on all events of the specific sourcetypes you define it for. Since the new fields are going to be permanently added to the data as they are indexed, the increase in disk space utilization needs to be accounted for as well. Also there is no reverting these new fields as these are indexed/persisted in the index. To remove the data, the ingest-time eval configurations would need to be disabled/deleted and letting the affected data age out.
When using Ingest-time eval also consider the following:
Validate if the requirement is something that can be met by having an eval function at search time – usually this should be yes!
Always use a new field name that’s not part of the event data. There should be no conflict with the field name that Splunk automatically extracts with the `KV_MODE=auto` extraction.
Always ensure you are applying eval on _raw data unless you have some index time field extraction that’s configured ahead of it in the transforms.conf.
Always ensure that your indexers or heavy forwarders have adequately hardware provisioned to handle the extra load. If they are already performing at full throttle, adding an extra step of processing might be that final straw. Evaluate and upgrade your indexing tier specs first if needed.
Now, lets see it in action!
Here is an Example…
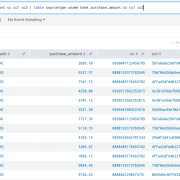
Lets assume for a brief moment you are working in Hollywood, with the tiny exception that you don’t get to have coffee with the stars but just work with their “PCI data”. Here’s a sample of the data we are working with. It’s a sample of purchase details that some of my favorite stars made overseas (Disclaimer: The PCI data is fake in case you get any ideas 😉):
Now we are going to create some ingest-time fields:
Making the name to all upper case (just for the sake of it)
Rounding off the amount to two decimal places
Applying a bank field based on the starting four digit of the card number
Applying md5 hashing on the card number
Applying a mask to the card number
First things first, lets set up our props.conf for the data with all the recommended attributes defined. What really matters in our case here is the TRANSFORMS attribute.
[finlog] SHOULD_LINEMERGE=false LINE_BREAKER=([\r\n]+) TRUNCATE=10000 TIME_FORMAT=%Y-%m-%d %H:%M:%S,%f MAX_TIMESTAMP_LOOKAHEAD=25 TIME_PREFIX=^ TRANSFORMS = fineval1, fldext1, fineval2 # order of values for transforms matter
Now let’s define how the transforms.conf should look like. This essentially is the place where we define all our eval expressions. Each expression is comma separated.
[fineval1] INGEST_EVAL= uname=upper(replace(_raw, ".+name=([\w\s'-]+),\stime.*","\1")), purchase_amount=round(tonumber(replace(_raw, ".+amount=([\d\.]+),\scurrency.*","\1")),2) # notice how in each case we have to operate on _raw as name and amount fields are not index-time extracted.
[fldext1] REGEX = .+cc=(\d{15,16}) FORMAT = cc::"$1" WRITE_META = true
[fineval2] # INGEST_EVAL= cc=md5(replace(_raw, ".+cc=(\d{15,16})","\1")) # have commented above as we need not apply the eval to the _raw data. fldext1 here does index time field extraction so we can apply directly on the extracted field as below... INGEST_EVAL= cc1=md5(cc), bank=case(substr(cc,0,4)=="9999","BNC",substr(cc,0,4)=="8888","XBS",1=1,"Others"), cc2=replace(cc, "(\d{4})\d{11,12}","\1xxxxxxxxxxxx")
All the above settings should be deployed to the indexer tier or heavy forwarders if that’s where the data is originating from.
A couple things to note – you can define your ingest-time eval in separate stanzas if you choose to define them separately in the props.conf. Below is a use case for that. Here I have defined an index time field extraction to extract the value of card number. Then in a separate stanza, I used another ingest-time eval stanza to process on that extracted field. This is a good use case of reusability of regex (instead of applying it on _raw repeatedly) in case you need to do more than one operations on specific set of fields.
Now we need to do a little extra work that’s not common with a search time transforms setting. We have to add all the new fields created above to fields.conf with the attribute INDEXED=true denoting these are index time fields. This should be done in the Search Head tier.
[cc1] INDEXED=true
[cc2] INDEXED=true
[uname] INDEXED=true
[purchase_amount] INDEXED=true
[bank] INDEXED=true
The result looks like this:
One important note about implementing Ingest-time eval configurations, is that they require manual edits to .conf files as there is no Splunk web option for it. If you are a Splunk Cloud customer, you will need to work with Splunk support to deploy them to the correct locations depending on your architecture.
OK so that’s a quick overview of Ingest-time eval. Hope you now have a pretty fair understanding of how to use them.
With the New Year, and cold winter, now upon us here in Toronto we thought it would be fun to kick it off by revisiting our award winning Hackathon entry from last years Splunk’s Partner Technical Symposium and adapting it to provide insights for our very own Toronto’s Bike Share platform leveraging their Open Data.
https://discoveredintelligence.com/wp-content/uploads/2018/10/Dock-Utilization.png499975Dhiren Meswaniahttps://discoveredintelligence.com/wp-content/uploads/2013/12/DI-Logo1-300x137.pngDhiren Meswania2019-01-11 17:09:492022-10-31 15:38:20Fun with Open Data: Splunking Bike Share Toronto