How to Query Hadoop in Splunk using DB Connect in 10 Simple Steps
Splunk DB Connect is designed to deliver reliable, scalable, real-time integration between Splunk Enterprise and relational databases. Essentially, it lets you query a relational database from within Splunk and return the results. As DB Connect leverages JDBC/ODBC to perform such a function, would it be possible to use DB Connect to query data sitting in Hadoop? Actually, yes… read on to find out more.
Before we go further – this approach not a replacement for using Hunk. However, it could possibly work well in situations where you have data in Hadoop, mapped to a schema in the Hive metastore. In this way, DB Connect essentially just treats it like any other database and you can query the Hadoop data from Splunk for lookups, indexing, mashing with native Splunk data, dashboarding etc.
In this example, we are going to go beyond Hive and leverage Cloudera’s Impala solution. Impala has an advantage over native Hive, in that it doesn’t leverage MapReduce, offering query response times that are comparable to a regular relational databases like Oracle or MS SQL. Additionally, the example provided below is what at best could be described as a quick n’ dirty proof-of-concept. It works, but is a bit rough around the edges. This entire exercise was performed on a Windows 8 laptop with 8Gb RAM, using the Cloudera Quickstart VM, VMware Player and a local install of Splunk.
Assumptions
- Splunk is installed and running. If you don’t have Splunk, you can download it from Splunk here. Splunk will run fine on your laptop for this exercise.
- Cloudera Hadoop is running. If you don’t have Cloudera, you can download their quick start VM from Cloudera here. The VM will run fine on your laptop for this exercise (if you have decent RAM).
The 10 Steps
- Get some data into Hadoop. In this example, we will use a freely available CSV of airport locations from openflights.org. (Download airports.dat file).
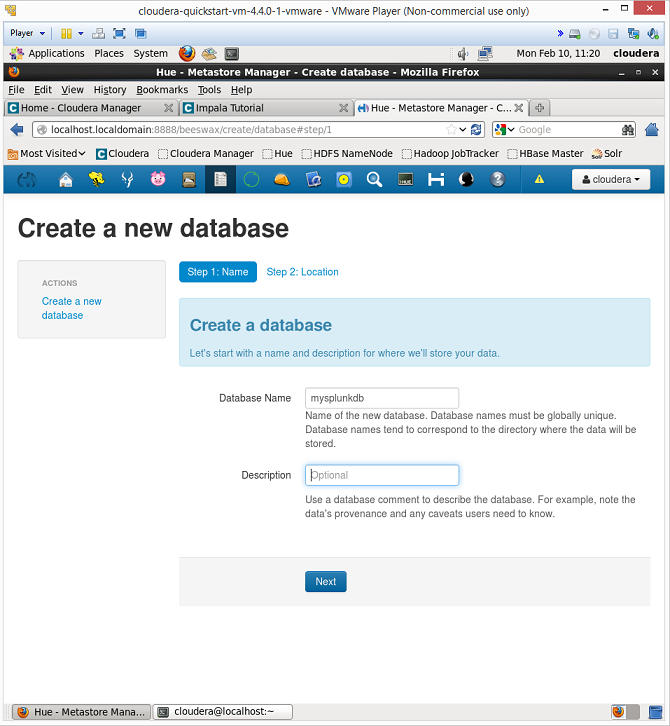
- Create a new database in Cloudera. In the Hue interface in Cloudera, go to the ‘Metastore Manager’. Select the database tab and create a new database. In this example, we will call the database mysplunkdb.
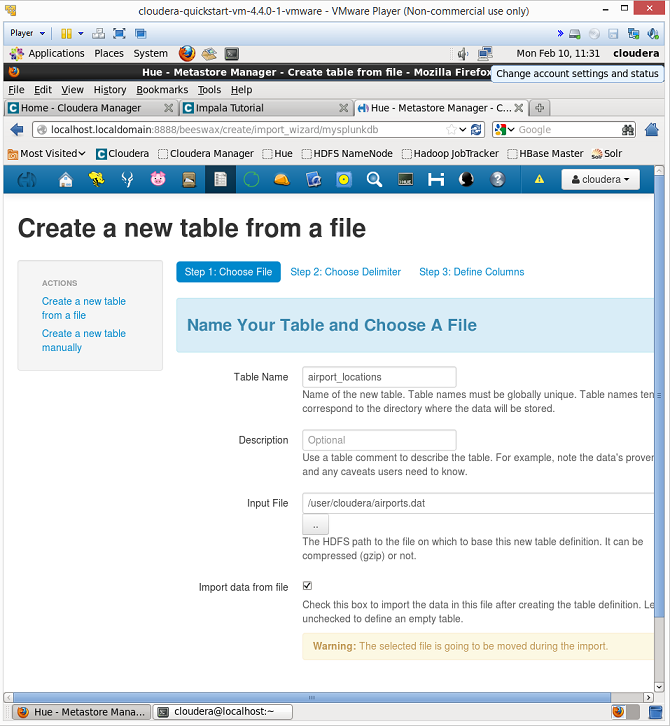
- Create new table and load data into it. Once the database is created, click on the link to the left labelled ‘create a new table from a file’. In this example, we will create a table called airport_locations and then we upload the airports.dat file. (**Note if using the VM, you might need move the airports.dat file into the VM to access it).
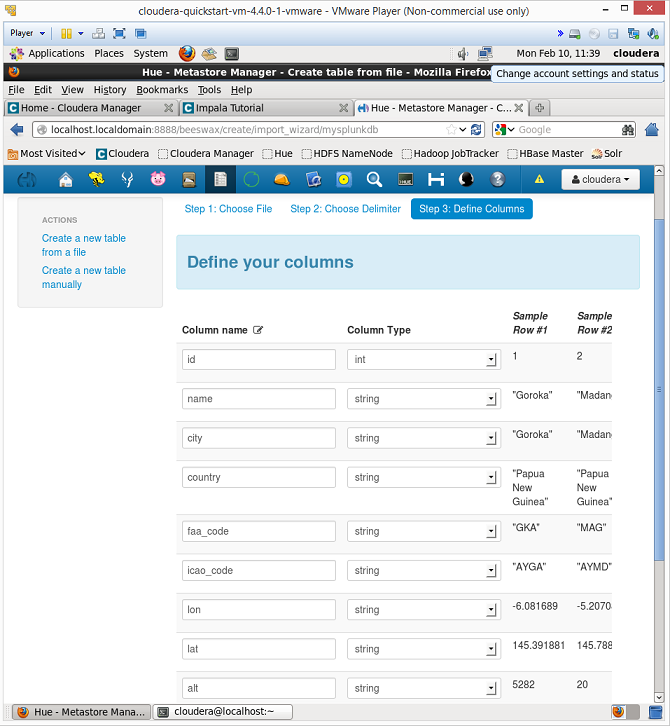
- Map the fields in the file to column names. After naming the table and selecting the file, cloudera will ask you to provide table column names. The order of the columns for the airports.dat file are: id, name, city, country, faa_code, icao_code, lat, lon, alt, tz, dst
- Run a test query in Impala. Go to the impala icon in the Hue interface and run the command: invalidate metadata. This will refresh the Impala metadata. Following this, you should see your new database listed in the Impala interface. Select the mysplunkdb database from the list and run a test query such as: select * from mysplunkdb.airport_locations. If everything works, the data should be returned.
- Download and install the Cloudera ODBC driver. Download from here and install on the same client that your Splunk instance is installed on.
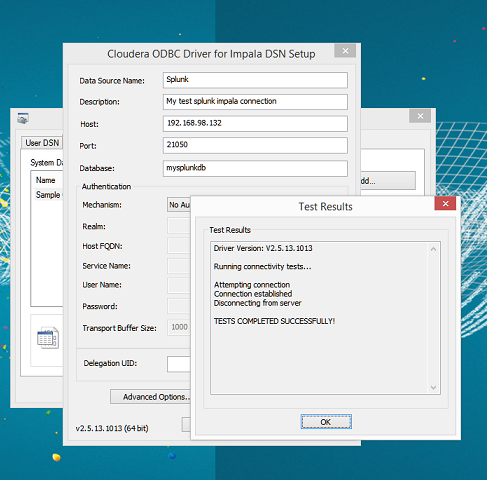
- Configure the Cloudera ODBC driver. Once installed, open the ODBC GUI and hit the System DSN tab. Then create a new connection and complete the details, adding in your cloudera host and database name. In this example, we didn’t use any authentication to keep things simple.
- Install DB Connect. Download from the Splunk app store here and install in your Splunk environment. Increasing the default heap size is recommended if you are able to do so.
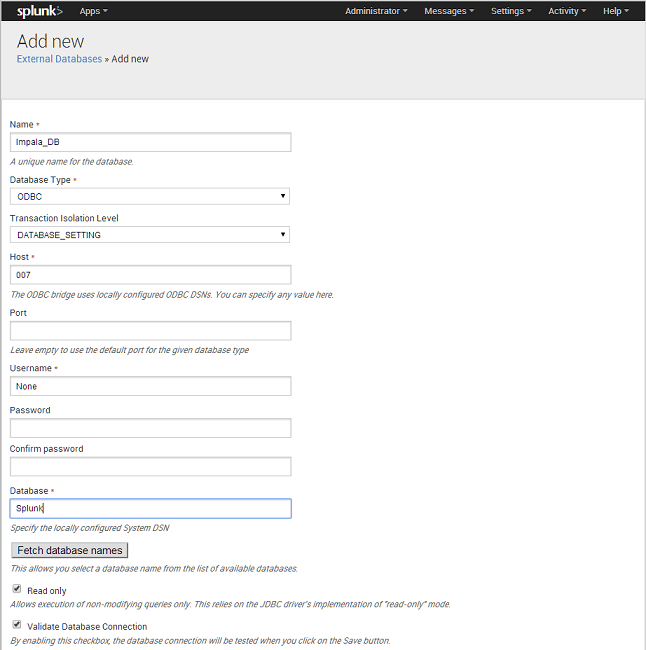
- Configure DB Connect. Once DB Connect is installed, you will see a new External Databases option from the settings menu in the top right of Splunk. Click this option and select to add a new external database. Give the DB a name such as Impala_DB, then select to use the ODBC driver. As we are using the locally configured DSN, we dont need to put anything in the host, so just make something up. Also we are not using any authentication in this example. Scoot down to the bottom and hit the button ‘Fetch Database Names’. You should see the name of the Cloudera System DSM you just created – select it, then hit save. Also, if you want to use this DB from all apps, make the permissions global, or you will only be able to see the data from the app that you just created the external database for.
- Run a search query from Splunk. Ok, that’s it – we are at the final step! Now we should be able to run the same query that we ran earlier from Impala, directly in Splunk. Let’s test it out. Open a new search bar in splunk and run the following:
| dbquery Impala_DB limit=1000 “select * from mysplunkdb.airport_locations”
You should see the results come back. If you wanted to do a count by country, you can actually do this via the SQL vs. the Splunk syntax (i.e. why bring all the data into Splunk if not necessary?). You can even mix and match a bit of SQL with Splunk as in the example below, which gets the top 10 countries with the most amounts of airport locations:
| dbquery Impala_DB limit=100000 “select country, count(*) from mysplunkdb.airport_locations group by country” | rename expr_1 as count | sort -count | head 10
You can of course keep going and dashboard it up – essentially rendering dashboards in Splunk calling data from Hadoop directly through DB Connect. You could also do other things like index the data into Splunk, leverage outputlookup to convert the data into a local lookup etc.
Wrap Up
Hopefully this posts encourages you to think about how you might be able to use the data in your business and how different systems such as Splunk or Hadoop can be made to interface and work together fairly easily with one another. In most environments, there is rarely a one solution fits all.
If you have more ideas for our how-to series, please contact us and let us know.
Looking to expedite your success with Splunk? Click here to view our Splunk service offerings.
© Copyright Discovered Intelligence Inc., 2014. Do More with your Big Data™. Unauthorised use and/or duplication of this material without express and written permission from this site’s owner is strictly prohibited. Excerpts and links may be used, provided that full and clear credit is given to Discovered Intelligence, with appropriate and specific direction (i.e. a linked URL) to this original content.


